Have you bought an Android and want move all your photos and videos from iPhone to new phone? We offer you a couple of simple ways that will compliment you on the task of backing up all your multimedia content.
The multimedia content that stores the photo gallery of any mobile is one of the main values for each person; not in vain we all record our memories by picking up the phone and shooting a photo or video. So, once you have chosen to make the leap from iPhone to Android, it is time to ensure that the entire reel is moved so that nothing is lost along the way. And there is no better way to facilitate that move than a key Android app: Google Photos.
Google Photos is the best way to migrate the entire gallery

All the owners of an iPhone, who have registered the phone with the respective Apple ID, have 5 GB in the cloud to not only save backup copies, contacts or documents, iCloud also supports full user reel. There is no iCloud app for Android, so you have to bet on an intermediate solution, such as Google Photos. This app, which combines gallery, cloud, cleaning tool and file sharing system, is one of the best cross-platform services offered by Google. It is also available on iOS.
Google Photos is in charge of moving all your content to the cloud so that you can access it from your new Android (or from the web). It is of considerable help to move the entire gallery from an iPhone to an Android, also in reverse: with the google Photos app you will also have the multimedia content of your Android on your iPhone.
The process for moving photos and videos is as follows:
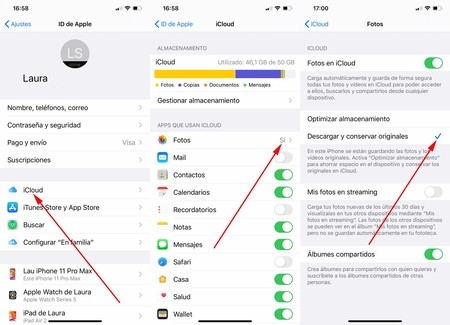
- Make sure all the photos and videos are physically on the iPhone. iCloud allows you to remove space on the phone if the reel has been synchronized, so Google Photos will not find the content if you have this function active. To delete it, go to the settings of your iPhone and enter your Apple ID. Then go to iCloud, go to ‘Photos’ and make sure the option of’ is checkedDownload and keep originals‘.
- Once the photos and videos are physically on the iPhone (you may have to free up space, it will all depend on the size of your iCloud backup) open Google Photos.
- Photos surely suggest you make the backup. If this is not the case, go to your avatar (upper right corner) and click on ‘Activate backup‘.
- You can choose ‘High quality’ (recommended) or upload the content in original quality (if you don’t want to lose quality and you have enough space in your Google account).
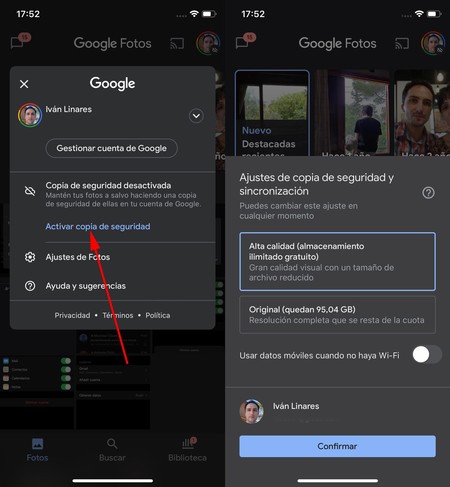
- Once you select the type of backup Google Photos will start to backup the content in the cloud: the whole process is automatic.
- You must keep Google Photos open and the iPhone with the screen on for the entire process to take place. If you turn off the screen, or close the app, iOS will stop copying until you return to Google Photos.
- Remember to make the backup only when you connect to a WiFi network. By default Google Photos has this option activated and will not make the copy with mobile data. You can change it from the settings.
The backup can take a long time, everything will depend on how much your photos and videos occupy and the upload speed of your connection. At the end you will have all the content in Google Photos and you can easily access it from your Android. Although yes, the images will not be physically on the phone, but you can access them from the Google Photos app and download the ones you want. You can also create albums to share the content with whoever you want.
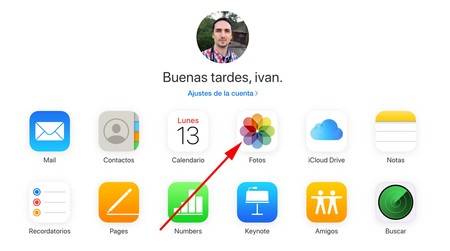
In case you want physically download the photos from iCloud to your Android Instead of going through Google Photos you can do the following:
- Access the iCloud website. It is best to perform the process from a computer.
- Sign in with your Apple ID and go to ‘Photos’.
- Select all the photos and videos (‘control + E’ or ‘cmd + A’, depending on whether it is Windows or Mac) and click on the download icon, just above.
 ICloud selection allows you to choose a maximum of 1,000 files
 - You can only select 1,000 files at a time. If your ‘Photos’ library has a greater number of photos and videos, you will have to select and download them in parts.
- Once the content is downloaded, unzip the Zip files and transfer the files to your new Android. You can easily do it by USB, for example.
