If you want to use Android on your PC, the easiest thing is to use an emulator. There are a multitude of them, like the well-known BlueStacks or others more focused on games like KO Player or MEmu, although if you are looking for something closer to what you have on your mobile, the best option is probably the Android Studio emulator.
The advantage is that Google has improved it a lot in the latest versions and it is also easy to download and test recent versions of Android, including for example Android 11. The “bad” news is that you first need to install Android Studio.
What do you need?
As we mentioned before, you need Android Studio, which is available for Windows, Mac and Linux. The System Requirements to use the emulator they are the same as to use Android Studio, only slightly more inflated. They vary little from one operating system to another, and are as follows:
|
Windows |
Mac |
Linux |
Chrome OS |
|
|---|---|---|---|---|
|
Version |
Windows 7/8/10 32 or 64 bit |
Mac OS X 10.10 or higher |
GNOME or KDE desktop, glibc 2.19 or higher library |
A model with Intel i5 or higher is recommended |
|
RAM |
4 GB, 8 GB recommended |
4 GB, 8 GB recommended |
4 GB, 8 GB recommended |
– |
|
Disc space |
4GB |
4GB |
4GB |
4GB |
|
Screen resolution |
1280 x 800 minimum |
1280 x 800 minimum |
1280 x 800 minimum |
1280 x 800 minimum |
The main problem with the emulator is the hardware acceleration Intel VT-X or AMD-V. In some cases it is disabled in the BIOS, so you must activate it before you can start the emulator. The process varies from brand to brand (and also the name of the option), but generally it shouldn’t be difficult for you to find how to activate virtualization in your case, as long as your processor supports it and your motherboard includes the option.
1. Create the virtual device
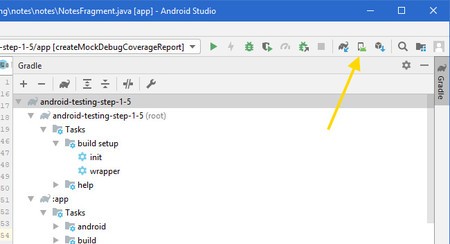
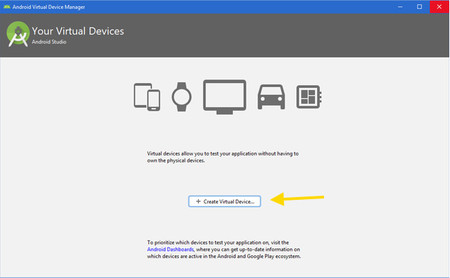
It all starts from Android Studio, where you must tap on the small button of the AVD Manager. AVD stands for Android Virtual Device, or Android virtual device. If you can’t find it, it’s also in the Tools menu.
The first splash screen doesn’t say much when there is no device created. It literally has a button, which is just the one you must press to get started. Press Create Virtual Device, or create virtual device.
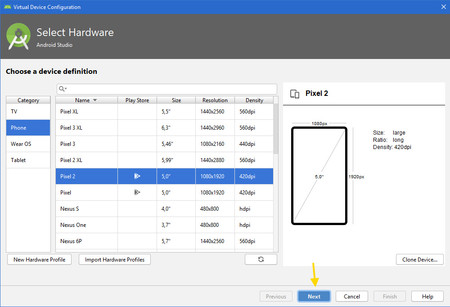
Now comes the interesting part: choose which device you are emulating. This is used to use the characteristics of this device, especially the resolution and size of its screen. Some of them include their own “skin” that makes the emulator dress like them.
You can choose any, though those that include the Play Store icon They will allow you to use the Google store, if you download the appropriate system image. When you have it, press Following.
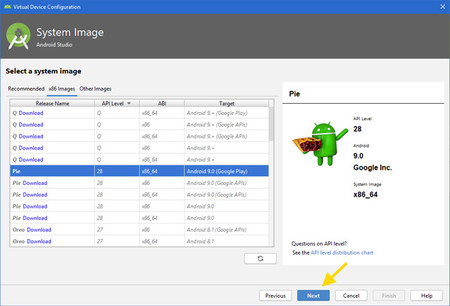
2. Download the system image
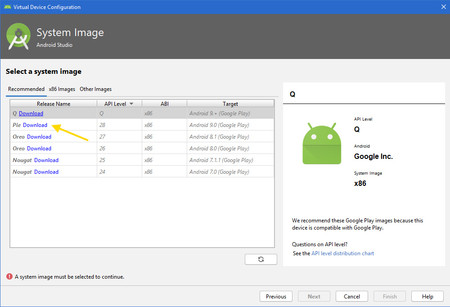
The previous step was quick, but now is the time to put the router and PC to work. You need choose the system image that you are going to install on the virtual device. Normally you won’t have any downloaded, so that’s the first thing you need to do, download it.
You can choose any, although it is better to stick to the first tab, the recommended. These are based on the same architecture as your processor, so they work much faster than those that don’t. Only those that specify it include Google Play, others include Google services but not Google Play, and others none of them.
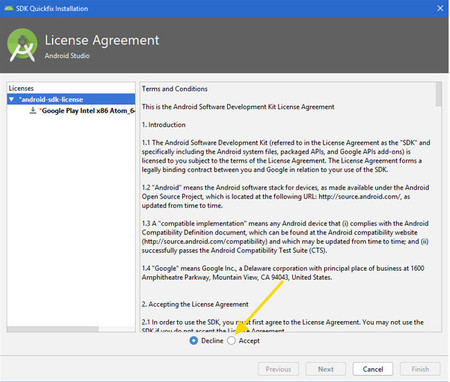
Before downloading anything you need to accept the license agreements for using the system image and Android SDK that you are about to download. Download doesn’t start until you do.
It will take a while, since the system images occupy several hundred megabytes, but as soon as it finishes downloading and installing you will return to the previous screen. The difference is that now the system image you downloaded can be selected. Do it and then tap Next.
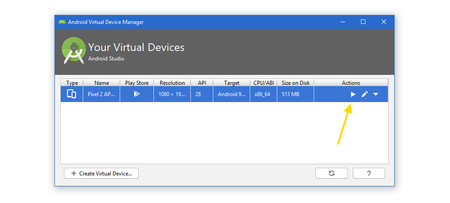
3. Load the emulator
By now you have done all the work and all you need is to enjoy the result. The same window that did not show anything before now includes your new virtual device. make click the play button And, if everything went well, the emulator will be launched.
Android can take a long time to appear, depending on the gross power of your computer, but sooner or later you should see Android tucked into a virtual phone on your desktop. With a powerful PC, the latest versions of the emulator are as fluid as a real device.

You can operate it with the mouse, helping you with the virtual buttons on the screen and the buttons that appear on the toolbar, to your right. If you want to access advanced options, click on the last button, the option button.